

They say sometimes a man has to do what he has to do. Theoretically, after shooting on my Mamiya RB 67 I could ship my 120 roll film off to CEWE, wait for a week or so, and then after finally receiving my negatives, ferry them over to a professional lab in Münster for a high-end scan. Theoretically. Practically, I have two problems with that: At this point I am simply impatient, and also I like to keep the edges of the film stock – it is part of the physical history of the shot and the character of the Mamiya. Since the professional options often cover those borders, I’ve been forced into the gung-ho reality of the home studio.
The DIY Rig
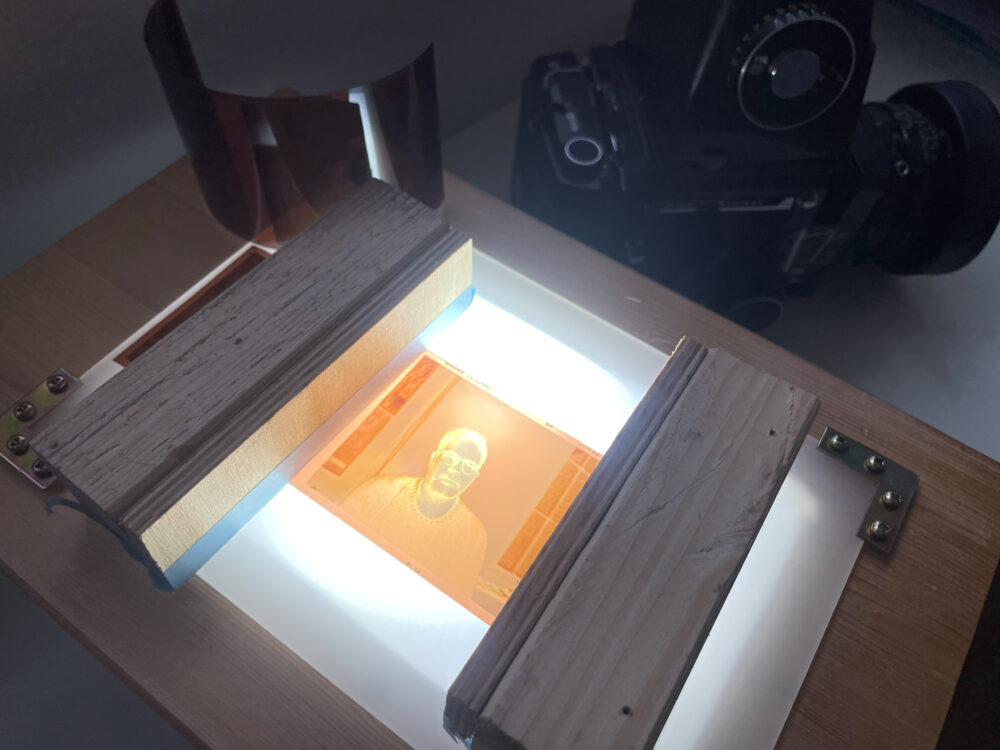
My setup is a testament to the fact that speed requires compromise and precision a bit of woodworking. I’ve built a custom holder using a monobloc as a backlight, topped with a sheet of opaque plexiglass. The frame itself is a handcrafted assembly of wood and screws—a rustic but functional stage for the film.
The physics of the setup, however, is where the real “fun” begins. There is a constant, exhausting tension between my clunky DIY engineering and the surgical precision needed for the film.
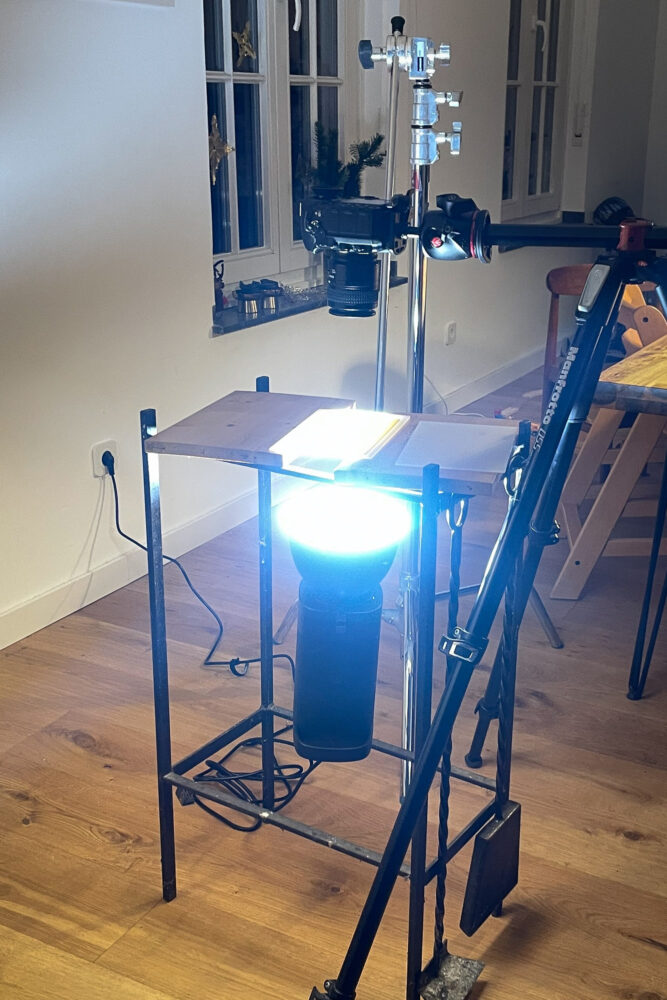
- The Levelling Act: Getting the negative holder perfectly level is step one. Step two is getting the Nikon D850 to match it.
- The Tripod Struggle: To achieve maximum resolution, the camera height has to be precise. Since my tripod’s middle column needs to be horizontal for this setup, I cannot simply crank it up or down. I find myself adjusting all three legs, spirit level between the teeth, trying to achieve a perfectly parallel plane.
- The Battle of the Curl: Cewe negatives sometimes arrive flat. Often they don’t. I started taping them down with masking tape, which was a disaster. Now, I’ve graduated to custom weights made from wood with a reasonably sharp edge to pin the film down.
Dust, Scratches, and the invisible Fight
Even with the weights, the environment is hostile. You’re constantly shifting between the “gross motor” work behind the setup and the “fine motor” delicacy required to keep the setup level and clean. Between the dust motes that appear out of thin air and the sensitive surface, it can be a high-stakes game of self control.
The Workflow: From Negative to TIFF
Once the “scanning” (or rather, re-photographing) is done, the digital alchemy starts. My current workflow is a four-stage process:
- Lightroom: First, the unskewing and cropping. Getting those medium format borders straight and properly framed is the first win of the day.
- Camera Raw & Photoshop: I open the file in Camera Raw and perform the “flip”—using the Tone Curve to turn the negative into a positive. Here, I set the white and black points and wrestle the white balance into submission. Then, it is off to the healing brush in Photoshop to painstakingly remove the aforementioned dust and scratches.
- The Export: Once the image is clean, I export the file as a high-resolution TIFF.
- The Final Polish: The TIFF goes back into Lightroom for the final edits.
It may not be the most efficient route, but it is a necessary ritual. It is a long road from a damp field in the fog to a finished TIFF, but seeing the final results makes every adjustment of the tripod legs worth the effort.

Comments
Joachim Brohm: A Mamiya RB67 Portrait in the Fog - Jan Söhlke Fotografie